martes, 31 de julio de 2012

Hachis parmentier (aka French shepherd's pie)


I've been thinking of making this French take on shepherds pie for a while but what prompted it was having a large bunch of parsley in the fridge. (You can't win with herbs - either you get a ridiculously small packet that costs the earth or a huge bunch that you end up wasting.)

There are of course many ways of making hachis parmentier which is basically a leftovers dish. A lot of recipes base it on a stew but you can make it with mince which is what I've done here having picked up a cut price pack in the Co-op reduced from £2.50 to £1.65. You can add some fried onion and garlic to it (which I did) and some finely chopped carrot and celery if you want. You don't really want it gravy-ish so chuck in half a glass of red wine if you have some and a splash of beef or chicken stock. (It's worth keeping frozen stock in an ice-cube tray when you need this kind of amount.)

The parsley is a touch I remember from a French cookery writer called Mireille Johnston who presented a BBC series back in the 90s. The books that accompanied the series were great but I left the relevant one in France so had to cook it from memory. If your kids don't like 'green bits' as many children don't you could cut the amount of parsley back to a single layer or mix it up with the mince so they don't (hopefully) notice, although, of course, the little blighters always do.

I can't remember if it had a layer of mash at the bottom of the dish but it's a good idea because you get some delicious stuck on crusty bits at the bottom of the pie.

Hachis Parmentier
Serves 2-4 depending on whether teenage boys are involved
2-3 tbsp light olive or sunflower oil
450g minced beef or lamb
1 medium onion, peeled and finely chopped
2 cloves of garlic, peeled and crushed
1 level tbsp tomato paste
75ml beef or chicken stock (or frozen stock cubes)*
75ml red wine (or 1 tbsp red wine vinegar and an extra 75ml of beef stock)
Pinch of cinnamon
Salt and freshly ground black pepper
A good big handful of fresh parsley, stalks removed and finely chopped

For the potato topping
800g boiling potatoes, peeled and cut into even-sized pieces (halves or quarters depending on size)
25g soft butter
A good splash of warm milk (about 3 tbsp)
40g comté, gruyère or cheddar cheese (optional)
Salt and pepper

You will also need a medium sized shallow baking dish (I used a rectangular dish that was 26cm x 21cm)

Heat a large frying pan, add 1 tbsp of the oil and fry half the mince until lightly browned. Remove the meat with a slotted spoon, letting the fat run back into the pan then discard the fat. Add the remaining mince to the pan, brown it and drain off the fat in a similar way. Add the remaining oil and fry the onion over a low heat for about 5 minutes until soft. Stir in the crushed garlic and tomato paste and cook for a few seconds. then add the wine, if using and beef or chicken stock. Tip the mince back in the pan, bring to simmering point then season with salt, pepper and a pinch of cinnamon. Turn the heat right down and leave on a low heat for about 20 minutes. (If it gets a bit dry add an extra splash of stock or some of the potato cooking water.)

Meanwhile put the potatoes in a saucepan, cover with cold water and bring to the boil. Cook for about 20 minutes until you can stick the point of a knife in them easily. Drain the potatoes, return them to the pan and cut them up roughly with a knife. Mash them thoroughly with a potato masher or fork. Beat in the butter and warm milk. Season with salt and pepper.


Preheat the oven to 200°C/400°F/Gas 6. Butter your ovenproof dish well and cover the base with a thin layer of mash (just over a third of the total). Sprinkle half the parsley over the top (as above) then cover with the mince. Add the remaining parsley then and spread the potato evenly over the top, roughing up the surface with the prongs of a fork. Sprinkle with grated cheese, if using. Place the dish on a baking tray and bake for 25-30 minutes until the top is crisp and brown. (If you make it ahead and cool it down before baking it it'll take more like 45 minutes)

* when you make a batch of stock it's worth reducing it then freezing it in an ice cube tray when you need a small amount of stock for a recipe like this

miércoles, 25 de julio de 2012

GREEN CHUTNEY / CORIANDER LEAVES CHUTNEY- RESTAURANT STYLE

I call this chutney as hotel chutney. I've already posted hotel white and red chutney. This is also the same as white chutney but i add little coriander leaves. U can combine mint & coriander leaves in equal ratio and try the same. It tastes great with idly.Let's go to the recipe..

green chutney hotel style

INGREDIENTS

  • Grated Coconut – 1/4 cup
  • Green chilly – 2-3 nos
  • Dalia/ fried gram dal / pottukadalai – 1 tsp 
  • Coriander leaves – 1/4 bunch
  • Ginger – 1/2 inch
  • Garlic cloves – 2 nos
  • Lime juice – As needed (optional – Add lime juice if chutney is spicy – i dint add)
  • Salt & water – As reqd.

To temper:

  • Cooking oil – 1 tsp
  • Mustard seeds – 1/2 tsp
  • Urad dal – 1/2 tsp
  • Red chilly – 1 no (pinched into two)
  • Curry leaves – A few

METHOD

  1. Take all the ingredients given above and grind it to a smooth paste by adding sufficient water.
  2. In a kadai, temper all the items given under "to temper". Add to chutney.
  3. Serve with idly adding sesame oil.


hotel green chutney

KITCHEN CLINIC

CORIANDER LEAVES

The Health Benefits of Cilantro

List of Cilantro Benefits:
  • Powerful anti-inflammatory capacities that may help symptoms of arthritis
  • Protective agents against bacterial infection from Salmonella in food products
  • Acts to increase HDL cholesterol (the good kind), and reduces LDL cholesterol (the bad kind)
  • Relief for stomach gas, prevention of flatulence and an overall digestive aid
  • Wards off urinary tract infections
  • Helps reduce feelings of nausea
  • Eases hormonal mood swings associated with menstruation
  • Has been shown to reduce menstrual cramping.
  • Adds fiber to the digestive tract
  • A source of iron, magnesium, and is helpful in fighting anemia
  • Gives relief for diarrhea, especially if caused by microbial or fungal infections
  • Helps promote healthy liver function.
  • Reduces minor swelling
  • Strong general antioxidant properties
  • Disinfects and helps detoxify the body
  • Stimulates the endocrine glands
  • Helps with insulin secretion and lowers blood sugar
  • Acts as a natural anti-septic and anti-fungal agent for skin disorders like fungal infections and eczema
  • Contains immune-boosting properties
  • Acts as an expectorant
  • Helps ease conjunctivitis, as well as eye-aging, macular degeneration, and other stressors on the eyes.
    • Blood Sugar: Due the stimulating effect of cumin on the endocrine glands, the secretion of insulin is increased from pancreas which increases the insulin level in the blood, thereby helping proper assimilation and absorption of sugar and resultant fall in the sugar level in the blood. This property is very beneficial for thediabetes patients and others too.
    • Other benefits: Still want more from it? You get it! Coriander helps cure ulcer, inflammation, spasm and acts as an expectorant, protects and soothes liver. It is anti-carcinogenic, anti-convulsant, anti-histaminic and hypnotic. Coriander is believed to be a natural aphrodisiac and previously it was extensively used in certain preparations, combined with other herbs, to enhance libido.

Side Effects or Contraindications of Organic Cilantro

While many sources state that cilantro has little to no adverse side effects, there are some sources that warn that cilantro leaf should not be used during pregnancy, as it may lead to an increase chance of miscarriage in mothers, or may reduce chances of conception in women trying to become pregnant. If you are pregnant or breast-feeding, please consult with your health care provider before consuming cilantro in any form


jueves, 19 de julio de 2012

Filled Fudge Cookies Revisited


I originally published this recipe in December 2010, and recently cooked them again, with a friend. Just for experience, she made them at her house before our baking session, and found that she had some difficulties with the dough.  I could tell immediately that she had overcooked the cookies, but when she described how dry her dough was, I knew that there was probably another problem.  We made them again, using the ingredients she had brought and found that the dough was way too dry.  The culprit seemed to be the flour.  The recipe called for unbleached flour, and that is what she had brought, but it was Gold Metal - Better For Bread, unbleached, and this flour has too much protein in it  for the dough to work (we know this because we made them again with Pillsbury unbleached and it worked fine).  I have changed the recipe to reflect this - it now calls for all-purpose flour - either unbleached or bleached will work fine, and will be less confusing to those who can only find unbleached bread flour.  The other issue was with the 1/2 can of condensed milk.  I, of course, did this by weight, using 7 ounces of the condensed milk - which actually turns out to be more than half of the can - even though the can says that it is 14 ounces.  The recipe now has a more precise measurement for this.  Lastly, we wanted the cookies to look more elegant so we drizzled them with dark and white chocolate.  I don't have a picture of the result, but they really looked wonderful.

This recipe is based upon a 1995 $50,000 Pillsbury Bake-off winner called Fudgy Bonbons.  It was a really good  confection, but not a great one, because the dough was kind of greasy and the filling bland.  The original recipe called for using chocolate chips, which got melted together with some butter and then mixed together with condensed milk and flour.  Because there was not a very large amount of butter, every time I made the cookies, the chocolate mixture seized - that is, it got stiff and grainy very quickly.  The quick fix to this was to melt the chocolate and butter separately, and then to combine the chocolate with the very large quantity of condensed milk, which worked beautifully (as long as the milk is at room temperature!).  I also thought that the dough would be smoother  and less greasy with less butter in it.  In addition to these problems, the original recipe called for using milk chocolate kisses in the center.  So here you had a rather sweet wrapping around a mediocre piece of chocolate candy, rather than having a contrast between the two and a superb chocolate candy center.  The last problem with the bon bons was that, although they tasted good the first day, after that the candy center hardened and then it was more like eating a wrapped candy, rather than a cookie.  All of these objections were easy to fix as you'll see in the following recipe.  In my opinion, I've turned a $50,000 bonbon into a $100,000 cookie!  Love to have your opinions!

Filled Fudge Cookies
7 ounces bittersweet chocolate, chopped ( I used Ghirardelli)
1 tablespoon unsalted butter
7 ounces (2/3cup) sweetened condensed milk, room temperature
1 teaspoon vanilla extract
1 cup (130 grams) all-purpose flour, measured by fluffing, scooping and levelling

30 Dove Promise candies, Caramel or Peanut Butter (or solid)

2 ounces semisweet chocolate, for decorating
2 ounces white chocolate, optional (to get it to melt thinly, you need  white chocolate with more than 31% cocoa butter (more than 15g/40g chocolate)

Preheat the oven to 350 degrees F. with a rack in the center of the oven.  Line a cookie sheet with parchment paper.

Place the chocolate in a large microwave-safe bowl, and heat it on medium power (5) for 1-1/2 minutes.  If the chocolate isn't yet melting, heat it for another 30 seconds.  Stir, and see if the mixture needs more heating or if it can rest and continue melting on its own.  Continue, heating, stirring and resting until the chocolate is melted and smooth.  Set aside to cool briefly.


Meanwhile, place the butter in a small microwave-safe bowl and heat it on 10 seconds to melt the butter.  Stir the condensed milk and vanilla into the chocolate and  then stir in the melted butter.


Add the flour and stir, and then knead the dough until all of the flour has been incorporated.

     
Keep the dough covered as you are making the cookies, and if it starts to crack a lot as you are making the cookies, drizzle  and knead in a little more condensed milk.

To make the cookies, pull off a small ball of dough, and flatten it in the palm of your hand or on a board until it is a scant 1/8-inch thick.  There are a few different shapes that you can make, and I use them to differentiate cookies that have different fillings.  This time, I used round shapes for cookies filled with solid chocolate ( I didn't like those for the reasons mentioned above), square shapes for the caramel filled cookies and triangles for the peanut butter filled cookies. 

For round or square shapes, set the Dove Promise square in the center of the dough you have just flattened, and then bring the sides up over the dough to encase the chocolate.


Once the dough is encased, you can squeeze and pat it in our hand and use your thumb and forefinger to shape the round.
 

For square shapes, tamp the cookie on its ends.


For triangles, I like to cut the Dove Promises in half.  If using the caramel filled ones, they will need to be frozen first.  I usually start with the same piece of dough as in the above examples, but I square it up on the work board and then turn it so that the pointed side is up.  I put the piece of candy in, wrap the top edges around the candy, estimate the amount of dough needed to finish the wrap, and then cut off the excess dough at the bottom. (When I try to cut it into the triangle shape first, I always seem to end up with too little dough, but you can do it anyway that gets the job done). 

The last thing to do is to seal the final edge, and I usually do that with a decorative rim.

Set the cookies on the prepared cookie sheet and bake them for 4-6 minutes.  DO NOT OVERBAKE. Cookies will be soft and appear shiny, but the bottoms will just be showing signs of being cooked and will look like barely-cooked brownies. Slide the parchment onto a cooling rack and let the cookies cool.  

The cookies aren't that attractive without some sort of decoration, and cookies that don't look great won't be perceived as great, even if they are! I usually just melt the 2 ounces of semisweet chocolate in a microwave-safe bowl for about 1 minute on power 5 or until melted.  I then make a little cone out of a plastic bag, snip off the tip and pipe some horizontal lines on the top to cover up the cookie blemishes. You can repeat the process with the white chocolate.
How long to let the cookies cool is definitely a matter of preference. After about 2 hours, the cookies will be cool, but the centers will still be totally liquid .  I prefer them after about 6 hours when the chocolate has firmed up a bit, but isn't yet hard.  By the next day, the centers will have firmed back to their original state.  You can put them back onto a cookie sheet and set them in a 100 or 200 degree oven for a minute or two to re-soften the centers slightly.

The cookies do freeze, although they are always much better when freshly made. Set the frozen cookies in a 300 degree oven for 5 minutes to defrost the dough and soften the centers.

Makes about 30 cookies


jueves, 12 de julio de 2012

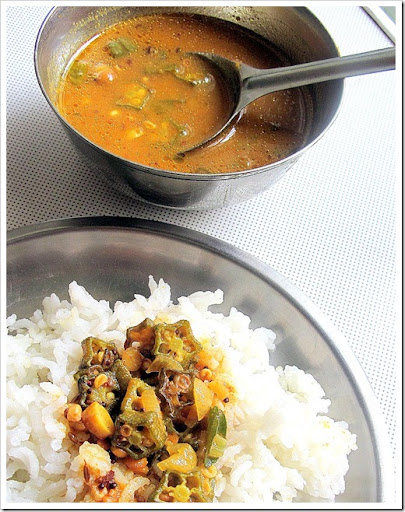
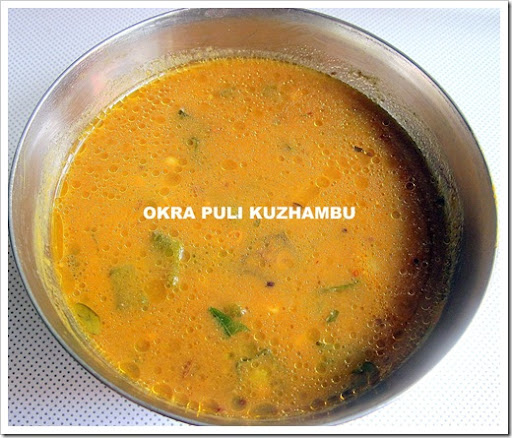
VENDAKKAI PULI KUZHAMBU

I wanted to try vatral kuzhambu with okra for a long time. I made it for today's lunch and i loved it.

okra puli kuzhambu

INGREDIENTS :

  • Okra / lady's finger / vendakkai - 5 nos (Chop into round thin slices)
  • Tamarind - small gooseberry size
  • **Sambhar powder - 1 - 1.5 tsp
  • Salt - as needed
  • Turmeric powder - 2 pinches
  • Jaggery - a small piece

To temper :

  • Cooking oil - 2 tbsp
  • Methi seeds / Fenugreek seeds - 1/4 tsp
  • Mustard seeds - 1/2 tsp
  • Jeera- 1/2 tsp
  • Urad dal - 1/2 tsp
  • Toor dal - 1/2 tsp
  • Small onions - 2 nos (finely chopped)
  • Garlic cloves - 4 nos (-do-)
  • Curry leaves - few (-do-)

METHOD :

  • Soak tamarind in warm water for 20 mins and take the extract. Add salt , sambhar powder and turmeric powder.set aside.
  • Now in a kadai , heat oil and add the tempering items in the same order.Saute for a while.Now add the chopped lady's finger pieces and saute well.
  • Now add the tamarind extract and allow it to boil till okra gets cooked. Add a small piece of jaggery.
  • Switch off the flame.Transfer to a bowl and add a tsp of gingely oil .Cover it and serve after 30 mins.This gives a special flavor for the gravy.

Mix with plain rice & enjoy with sutta appalam :)

** For sambhar powder recipe, please refer the side bar. U can use ur home made or store bought powder too.There will be no change in taste i guess..

okra puli kuzhambu 1

KITCHEN CLINIC:

Lady's finger /Okra :

Okra, also known as Ladies Fingers, Gombo, Bendi or Gumbo, appears to have originated from the West Africa and is well known for its great health benefits.

Benefits of Okra
According to research done by Ms. Sylvia Zook (Ph.D, nutrition, University of Illinois), Okra is full of valuable nutrients, nearly half of which is soluble fiber in the form of gums and pectins. Soluble fiber helps to lower serum cholesterol, reducing the risk of heart disease.

The other half is insoluble fiber which helps to keep the intestinal tract healthy, thus decreasing the risk of some forms of cancer, especially colon cancer. Colon Cancer is the third most common form of cancer and the second leading cause of cancer-related death in the Western world.

okraThe superior fiber found in okra helps to prevent diabetes and constipation. Okra is a rich source of many nutrients, including vitamins A, B6, C, iron and calcium.

Ladies finger is a very useful vegetable and inexpensive medicine, as it is available practically round the year in India. Due to its sweet taste, cold potency, vata-pitta pacifier nature, strength promoting aphrodisiac qualities, it is a very useful to ladies close to menopause. It is found beneficial in leucorrhoea and dysuria also.

Okra is also reported to be beneficial to those suffering from diabetes as it helps to stabilize the blood sugar. Some people have even claimed to have cured their diabetes or their condition greatly improved with the daily consumption of water that has been soaked with okra.

**Take two pieces of Lady Finger (Bhindi) and remove/cut both ends of each piece. Also put a small cut in the middle and put these two pieces in glass of water. Cover the glass and keep it at room temperature during night. Early morning, before breakfast simply remove two pieces of lady finger (bhindi) from the glass and drink that water.

Keep doing it on daily basis.

Within two weeks, you will see remarkable results in reduction of your SUGAR.

Health Benefits of Lady's Finger :

  1. 1) The vegetable is a good provider of good bacteria called the probiotics. Probiotics helps in biosynhtesis of vitamin B. They also help in proliferation just like the yoghurt.
  2. 2) Nurture you hair : Lady's Finger can be applied to hair as the last rinse to make your hair bounce.
    Follow the steps ahead
    • Slice the lady's finger horizontally and boil it till the is brew is slim.
    • Cool it off and add few drops of lemon juice to it.
    • Apply this to your hair and enjoy the bouncy look.
  3. Lady's finger has other health benefits as mentioned below.
    1. Excellent laxative.
    2. Treats Bowels.
    3. Heals Ulcers.
    4. Soothes the gastrointestinal tract.

Lady finger is also known as Okra. It is a very valuable source of nutrition. It can help with the following health conditions:

  1. It helps relieve constipation
  2. It helps control blood sugar as it curbs the rate at which sugar is absorbed from the intestinal tract.
  3. It helps in healing acid reflux
  4. It contains soluble fibre which helps in controlling the cholesterol level in our bodies.
  5. It contains insoluble fiber too which keeps the intestinal track healthy.
  6. Lady Finger helps in reducing risks of deadly diseases like cancer.
  7. Lady fingers are especially beneficial for the control of colo-rectal cancer .
  8. Human body is recommended to have a certain level of vitamin B 6 and folic acid. Half a cup of cooked Lady fingers provide nearly 10% of the recommended levels of vitamin B6 and folic acid.

Here are some nutritional facts of Lady fingers:

Okra Nutrition (half-cup cooked Lady Finger) contains:

  • Calories : 25
  • Dietary Fiber : 2 grams
  • Protein : 1.5 grams
  • Carbohydrates : 5.8 grams
  • Vitamin A : 460 IU
  • Vitamin C : 13 mg
  • Folic acid : 36.5 micrograms
  • Calcium : 50 mg
  • Iron : 0.4 mg
  • Potassium : 256 mg
  • Magnesium : 46 mg

To retain the nutrients present in lady fingers, it should be cooked as little as possible, eg with low heat or lightly steamed. You can even eat it raw.


domingo, 8 de julio de 2012

sábado, 7 de julio de 2012

Mushroom Barley Soup


I love soup  because it's so easy to make, doesn't really need fussing, measuring or gussying up - in other words, just the opposite of baking.  Especially when I've put all of my energy into making dessert and making it pretty, soup is just so easy!  And nothing is better on a cold winter evening, than a nice bowl of hearty soup.  My Dad, who loved to eat, didn't start cooking until later in life, after he and my mother both retired.  He, too was a great lover of soup.  This recipe is basically his with just a few minor changes and a fleshing out of the techniques.  He used equal portions of dried and fresh mushrooms, but I don't usually keep dried mushrooms around, and they can be hard to find.  I find that the cremini mushrooms are so tasty that the dried ones are not needed.  If you do decide to use some dried mushrooms, soak them in hot water, drain them reserving the liquid and then strain the liquid into the soup

Serves 6

1 tablespoon mild oil, divided
3/4 cup cremini mushrooms, washed, dried and chopped
1/4 Vidalia onion, skin removed, and chopped into 1/4-inch pieces
1 celery stalk, diced
2 carrots, peeled and diced
4 cups low-sodium chicken stock
4 cups low-sodium beef stock
1/2 cup pearl barley
1 cup non-fat half & half
salt and pepper to taste

Add the 2 teaspoons oil to a large stockpot.  Heat on high, and when the oil is hot, add the mushrooms, and saute until brown.


Reduce the heat, add the remaining oil, onions, celery and carrots, and cook for about 5 minutes, until the onions are translucent but not brown.  Add the stock and the barley.  Cover the pot and simmer for 1-1/2 hours.


You can leave the soup as it is, but I like to puree a few ladlefuls , which makes the texture more pleasant to me, and also thickens the soup.  I use a slotted spoon to transfer about a cup or two of veggies and barley to the processor, and then I process it until it is not quite smooth.  After it is ground up pretty well, you can add a little of the broth to help get it pureed.  Once it has the texture you like, scrape it back into the soup.  Stir in the half & half, bring back to a simmer, and serve.  Soup almost always thickens overnight.  If you want it more liquidy when you reheat it, add more half & half or puree some more of the veggies.

miércoles, 4 de julio de 2012

Top 5 Reasons Why I Love Thanksgiving

Thanksgiving table

Thanksgiving is hand's down, my favorite holiday of the year. I think I even like it better than my birthday, which is really saying something. So here's why:

1. There is nothing you have to do on Thanksgiving, other than share a meal. There are no religious ceremonies or gift giving. You can say a prayer before eating or watch a parade or play football if you want, but you can also take a nap! It's all good.

2. It's inclusive. Anyone who is in America (or outside of America for that matter) can celebrate this holiday if they want to. It's not about race or religion or nationality, in fact, it's about welcoming and helping those who are newcomers and celebrating the harvest.

3. It's about comfort food. I hear a lot of people complaining about traditional Thanksgiving food, they say turkey is boring, pumpkin pie is heavy and stodgy. To them I say, it's comfort food, not fine dining. Get over it. Besides, this holiday is about sharing a meal with friends and family, what you eat is secondary. Go out for Chinese food if you prefer, that is, if you can find a Chinese restaurant that's open.

4. It's two blessed days off. For most people anyway. That is reason enough to be thankful.

5. Leftovers!

Happy Thanksgiving!

A few favorite past Thanksgiving posts from the archives:

How Thanksgiving became a national holiday

Brussels sprouts with brown butter and hazelnuts recipe

Cranberry coffeecake recipe

Curried Butternut Squash Soup recipe

Pilgrim onion marmalade recipe

Turkey drumsticks braised in cranberry sauce recipe

lunes, 2 de julio de 2012

Favorite Foods of Hawaii

During the plantation era workers in Hawaii sat together at lunch and ate a bite of whatever their co-workers brought. It might have been adobo, fried rice or teriyaki. Call it potluck, Hawaii style. Trying new flavors has long been part of Hawaii's heritage and something you should do too when you visit. Trying local specialties and discovering new (and old under-the-radar) places in Hawaii is one of my favorite vacation activities.

Everyone has their 'must try' things to eat in Hawaii. Here are just a few of mine and where to find them on Oahu. Each one of these dishes tells you a little something about the culinary history of Hawaii.

poke title=
Poke (pronouned po-kay)
Where to find:
Everywhere, but Alicia's Market has a big selection

This is perhaps one of the most 'authentic' dishes from Hawaii. It's primarily raw fish and it comes in many varieties such as wasabi, tobiko, and Maui onion, but traditionally it was just chunks of fish such as ahi, salt, seaweed and a bit of toasted kukui nut, all native ingredients.

manapua title=
Manapua
Where to find:
Royal Kitchen in Chinatown

These filled buns look like cha siu bao, but the version you find in Hawaii is larger and a little sweeter and much lighter. The dough seems a bit more Portuguese than traditional Chinese. You can also get it filled with Kalua pork which you definitely won't find outside of Hawaii.

pork hash
While at Royal Kitchen don't miss the 'pork hash' Hawaii's version of siu mai. It's unique and succulent with less ingredients than siu mai, but it's very tasty all the same. Both the manapua and the pork hash are very inexpensive.

taro chips
Taro Chips
Where to find:
Everywhere but for freshly made chips go the Hawaiian Chip Factory Outlet

You may or may not appreciate poi, but you are sure to enjoy taro chips. The Hawaiian Chip Company opened in 1999 and makes very popular vegetable chips served at restaurants, on Hawaiian Airlines and they are widely available in stores. But at the factory shop you can get a freshly made hot bag of chips and season them yourself. You can also get a snack, like the killer sliders they serve on Saturdays.

malasadas title=
Malasadas
Where to find:
Leonard's Bakery

These Portuguese donuts are a must. The big neon sign at Leonard's letting you know when they are fresh will lure you in. I don't know anyone who doesn't love these hot, yeasty, moist-in-the-middle pillows of love, better than any Krispy Kreme, that's for sure.

shave ice
Shave Ice
Where to find:
Many places, but I like Tats the best

Better than a snow cone, more like a snowball, the best shaved ice is super fluffy. Shave ice first appeared as a cooling treat on the plantations, and was brought to Hawaii by the Japanese. Get it flavored with something tropical like lilikoi. It's sweet and cooling which is the perfect combination when temperatures rise. Favorite spots are widely debated. It's often said the older the shave ice machine, the better the shave ice.

My thanks to the Hawaii Visitors & Convention Bureau and especially local girl and Oahu writer Catherine Toth for introducing me to some (but not all) of the items featured here